Apaya Consent Setup
Send your users to the Apaya Consent Setup page where they can select their desired payment option and provide their consent for future merchant-initiated payments (MIT) or customer-initiated payments (CIT). Apaya will manage the identification for all users and gather their consent, enabling payments via the Apaya API. Ability to perform refunds is available depending on the payment mechanism.
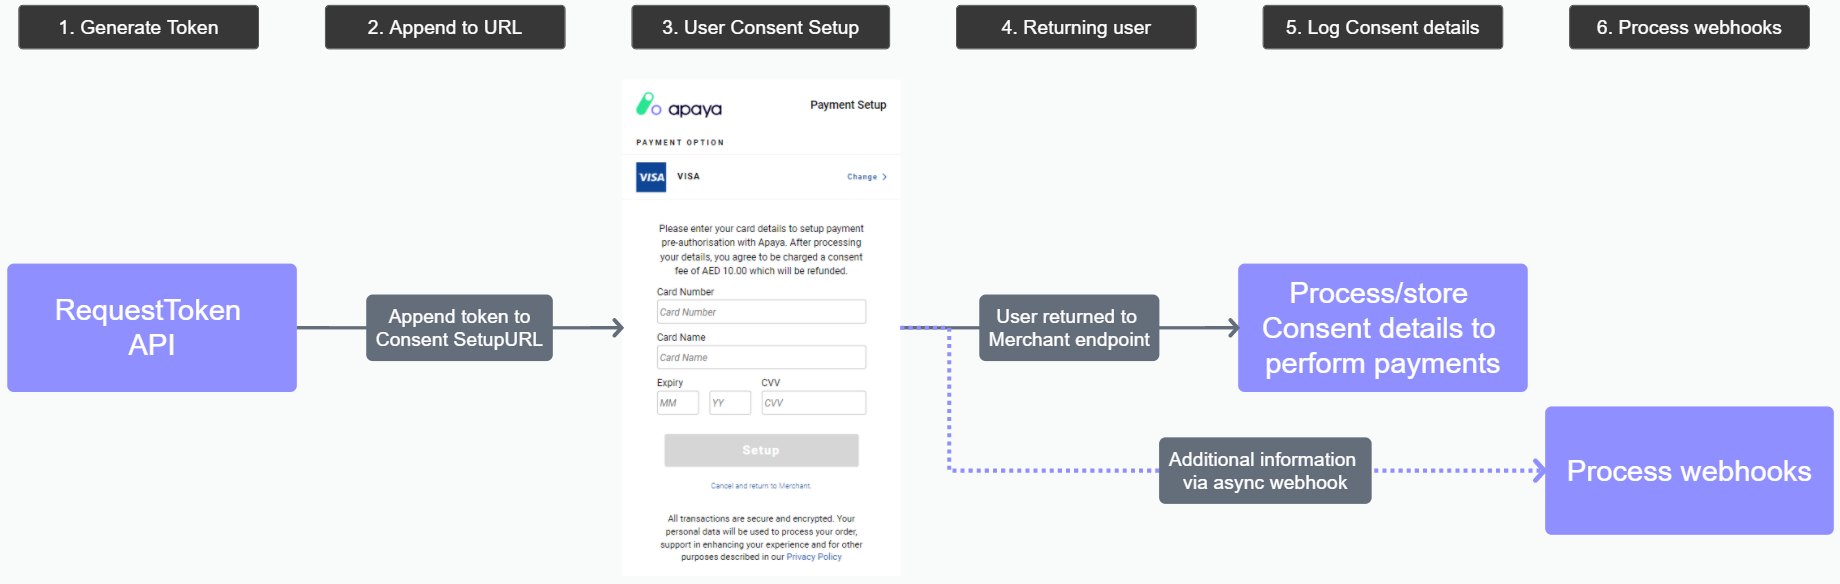
Breakdown of steps:
You will need an Apaya Portal account so that you can configure a Connector, create a Product, and Workflow. You will need access to your Product ID and API integration credentials from the Apaya Portal to integrate and test the steps below.
If you don't have an Apaya Portal account then click here to create your account and receive access credentials via email. You’ll be able to use these credentials for both the Sandbox and Production Apaya Portals.
If you already have an Apaya Portal account, click here to access the Portal and gather the necessary credentials and product ID to test the flow below.
Generate Consent Setup Token:
Generate a unique token to access the Apaya Consent Setup by calling the RequestToken API method (Sandbox: RequestToken).
Note: You must use a tokenTypeId of 6 when requesting a token for MIT Consent Setup (after which MIT transactions can be performed).
Note: You must use a tokenTypeId of 10 when requesting a token for CIT Consent Setup (after which CIT transactions can be performed).Send users to Apaya Consent Setup:
Send your user to the Apaya Consent Setup URL by appending the token .e.g.Sandbox: https://sandbox-checkout.apaya.io/setup/WHrH7zOq2hnDbJcYUuSgUXLwZ9J0LEfqemRV2x12345Production: https://checkout.apaya.io/setup/WHrH7zOq2hnDbJcYUuSgUXLwZ9J0LEfqemRV2x12345User provides their consent:
Your user will provide their consent on the Apaya Consent Setup page, and upon successful completion, or upon failure (or if the user cancels the flow mid-way) they are returned to your endpoint.
Note: This return endpoint is configured against your product in the Apaya Portal.Consent Setup page returns user:
The user will return to your endpoint containing the following information in the URL e.g.http://www.example.com/?token=A9IotQFdJBSYjth7h)hGWmFAgzVjxU6xeGGT)AaAbB= &success=1&pt=ExamplePTValue&status=SUCCESS&hashedIdentifer=XXXXXXXXXXXX6417&providerId=1003&userConsentToken=OVoDEZZiD0F4heWCg7yYm3oTRjC7yU4i)JGxxdswOglsA%3d__kOJ49PeAFlVjgDDh5Ocrh)KXXXE3edA64xbIotu94%3dtoken - Populated with the original token passed in when starting the Apaya Consent Setup flow.
pt - The pass-through value provided in the Token
success - '1' signifying that successful acquisition has taken place. '0' if not.
status - Contains a brief description of the status of the user after the consent setup flow. See Status Values for details, especially any 'SETUP_' statuses.
hashedIdentifier - Contains a 'hashed' user identifier (card number, mobile number, or other) which you can display on your UI after being decoded.
Card numbers will be hashed with an 'X' character except for the final 4 digits E.g. XXXXXXXXXXXX6417
providerId - The payment provider used when providing consent. See Providers for a full list.
userConsentToken - The encrypted consent token created by the Apaya platform. Store this in your platform for use in future interactions with Apaya APIs to trigger reserve/authorization and when capturing a charge. If the user abandons the flow or fails consent, this will be returned as an empty parameter.
Store details and trigger payments:
Log details of the Consent Setup in your platform and perform payment API calls now that the end-user has given pre-authorisation for this service. View API documentation for the options below:IMPORTANT NOTE: You may receive an error when triggering payments using the userConsentToken if the customer's associated payment card has expired.
Ensure that you store the identityExpiry value in the asynchronous webhook (see 'Handle webhooks' below), which contains the card expiry date.
You can use this to notify your customer when they are approaching their card expiry date, and send the customer back through the Consent Setup flow which, upon success, will provide you with a new userConsentToken to store against your customer record.Handle webhooks:
Handle asynchronous webhook notifications from the Apaya platform. Click here for more details.
Note: These webhooks are currently just for the payment aspect of the Consent Setup flow.
Get Production access:
Once you're happy with your Sandbox tests and you want Production access, sign in and go to Products and click on Production. Configure a 'subscription' just as you did for Sandbox. Give your subscription a relevant name, again you can change this later if required.
Your Production subscription will be sent to Apaya for approval. Once approved, you will have access to the production API. Click on the green 'Try It' button to test your request and see a response from any of the required production API methods. Note: Your API access key will only be pre-populated after your Production subscription request has been approved by Apaya.
Ensure you configure your Connector/s, Product/s, and Workflow/s on the Production Apaya Portal and gather the necessary credentials and product ID/s to test your Production flows.
If you require any assistance, contact us on support@apaya.io